Best Guide For Revisiting Horrific Visions of N’zoth in The War Within

Revisited Horrific Visions is a limited-time event launching with Patch 11.1.5 of The War Within. Inspired by the original Horrific Visions from Battle for Azeroth, this updated version offers new challenges and a fresh set of rewards. Players can earn new mounts, transmog appearances, and useful catch-up gear for alts. It’s a nostalgic return with meaningful updates, perfect for both veterans and newer players looking to gear up and dive into dark, vision-fueled content.

What's New In Horrific Visions

The updated Horrific Visions in The War Within retain the core experience from Battle for Azeroth, but introduce fresh systems, mechanics, and exciting new rewards. Here’s what’s new and noteworthy in these reimagined challenges:

A new currency called Displaced Corrupted Mementos is introduced in Revisited Horrific Visions. These are used for upgrades and cosmetic rewards. At the end of a run, any Corrupted Mementos you earn will be automatically converted into Displaced Corrupted Mementos, ensuring all progress contributes toward the new reward systems.

Three brand-new masks have been added to raise the challenge level in Revisited Horrific Visions, pushing the difficulty cap to 8-mask runs—an increase from the five-mask maximum seen in Battle for Azeroth.

Soridormi now appears as a helpful NPC companion during Revisited Horrific Visions. She can take on any of the core roles—Tank, DPS, or Healer—providing flexible support based on your group’s needs.

The Titanic Research Upgrade System is making a return in Revisited Horrific Visions but has been split into two distinct parts. First, the Hourglass of Horrific Visions offers an upgrade tree that uses Displaced Corrupted Mementos to enhance your runs.
Second, Tributes—formerly part of Titanic Research—are now tied to completing specific objectives, gradually boosting your power and efficiency as you progress through the visions.

Rune Enchants – Corruption Gear System

One of the most exciting additions in Revisited Horrific Visions is the return of Corruption-style effects, now reimagined as Helm Rune Enchants. These new runes bring back several iconic powers from Battle for Azeroth‘s Corruption system—but this time, with a twist. While their effects are toned down compared to their original forms, they now come without any of the negative drawbacks. This offers a fun way to revisit some of BFA’s most memorable bonuses in a more balanced and accessible way.

You can obtain these Helm Rune Enchants after completing quests that require looting currency from the end chests of Horrific Visions:

Lesser Runes are purchasable after completing Borrowing Corruption and cost 500 Displaced Corrupted Mementos each. Access is unlocked for your entire Warband once you complete the quest. Lesser Runes are purchased from Augermu in Dornogal.

Rune
Effect
Gain Void Ritual, giving all your spells and abilities a chance to increase all secondary stats by 109 every second for 20 seconds.
Your attacks have a chance to spawn a tentacle which Mind Flays your target for 36,649 Shadow damage every second for 10 seconds.
Your damaging spells and abilities have a chance to cause your target to ooze blood for 114,660 damage over 7 seconds.
Your spells and abilities have a chance to strike a nearby enemy with an Infinite Star, dealing 100,787 Arcane damage and increasing their damage taken from your Infinite Stars by 27,487, stacking up to 6 times before resetting.
Your damaging abilities build the Echoing Void. Each time it builds, Echoing Void has a chance to collapse, dealing 18,324 Shadow damage to all nearby enemies every 1 second until no stacks remain.
Allows your attacks to have a chance to trigger a beam of Twilight Devastation, dealing up to 732,998 Shadow damage to enemies in front of you.

Greater Runes are obtainable after completing Enhancing Corruption, costing 1000 Displaced Corrupted Mementos each. Access is granted to your entire Warband after completing the quest once. Like Lesser Runes, Greater Runes are purchased from Augermu in Dornogal.

Rune
Effect
Gain Void Ritual, giving all your spells and abilities a chance to increase all secondary stats by 151 every second for 20 seconds.
Your attacks have a chance to spawn a tentacle, which Mind Flays your target for 50,727 Shadow damage every second for 10 seconds.
Your damaging spells and abilities have a chance to cause your target to ooze blood for 158,697 damage over 7 seconds.
Your spells and abilities have a chance to strike a nearby enemy with an Infinite Star, dealing 139,498 Arcane damage and increasing their damage taken from your Infinite Stars by 38,044, stacking up to 6 times before resetting.
Your damaging abilities build the Echoing Void. Each time it builds, Echoing Void has a chance to collapse, dealing 25,363 Shadow damage to all nearby enemies every 1 second until no stacks remain.
Allows your attacks to have a chance to trigger a beam of Twilight Devastation, dealing up to 1 million Shadow damage to enemies in front of you.

What Are Horrific Visions

Horrific Visions were a key feature in the Battle for Azeroth expansion, where players faced corrupted versions of Stormwind and Orgrimmar. Players completed various objectives to disrupt the visions and prevent them from becoming reality. These scenarios provided challenging content that tested players’ abilities and rewarded them with unique gear and currency. Revisited Horrific Visions in The War Within expand on this idea, introducing new challenges and rewards to further enhance the gameplay experience.

Each week, players will experience either the Orgrimmar or Stormwind Horrific Vision, with the scenario alternating on a weekly basis.
Players can attempt these scenarios solo or in groups of 1-5 players. The difficulty, including enemy health, will scale based on the number of players in the group.
Unlike the Battle for Azeroth version, which was limited by the number of Vessel of Horrific Visions, Revisited Visions of N’Zoth can be accessed as often as desired. However, it’s still advisable to run these scenarios in groups, especially as you progress and take on more challenging masks.

Horrific Visions: Faceless Masks

Faceless Masks are an end-game feature in Horrific Visions. They let players increase the difficulty of their runs for greater rewards. As you progress, you’ll acquire these masks, which can be activated before entering a vision to modify the challenge.
Masks can be activated or deactivated in the vision’s starting area before beginning the run. Shrines glowing red represent masks collected by players in the group. There are a total of 8 Faceless Masks, each adding a layer of difficulty and reward when equipped.

All 8 Faceless Masks provide the following benefits, which stack when multiple masks are active:

Equipping all 8 masks results in enemies having 200% extra Health and Damage, while players earn a total of 140% more Corrupted Mementos.

In addition to the basic benefits, each Faceless Mask introduces a unique challenge:

Masks must be earned by at least one player in the group to be used.

Where To Find Faceless Masks: All Locations

MaskUnlock Condition
Faceless Mask of the Long Night Faceless Mask of the Long NightComplete all five objectives within a single visit of a Horrific Vision.
Faceless Mask of the Burned Bridge Faceless Mask of the Burned BridgeWith one mask active, complete the Valley of Wisdom objective in the Horrific Vision of Orgrimmar.
Faceless Mask of the Daredevil Faceless Mask of the DaredevilWith one mask active, complete the Valley of Honor objective in the Horrific Vision of Orgrimmar.
Faceless Mask of the Pained Faceless Mask of the PainedWith one mask active, complete the Old Town objective in the Horrific Vision of Stormwind.
Faceless Mask of Dark Imagination Faceless Mask of Dark ImaginationWith one mask active, complete the Mage Quarter objective in the Horrific Vision of Stormwind.
Faceless Mask of Vengeance Faceless Mask of VengeanceWith one mask active, loot the Faceless Mask of Vengeance being revered by a group of Vengeful Voidspeakers at the Canals in the Horrific Vision of Stormwind, between the Trade District and Old Town.
Faceless Mask of the Nemesis Faceless Mask of the Nemesis

With one mask active, defeat two iconic nemeses in each Horrific Vision and fuse their Nemesis Shards to obtain the mask:

  • Defeat Hogger in the Horrific Vision of Stormwind by interacting with his WANTED poster just to the right of the entrance to the Mage Quarter area and loot his Nemesis Shard Nemesis Shard.
  • Defeat Gamon in the Horrific Vision of Orgrimmar by interacting with his axe on the table on the right portion of the first floor of the Broken Tusk inn at the Valley of Strength and loot his Nemesis Shard Nemesis Shard.
Faceless Mask of Multitudes Faceless Mask of MultitudesWith three masks active, complete all objectives within a single visit of a Horrific Vision.

Best Progression for Revisited Horrific Vision Masks

Once you have access to all 8 Faceless Masks, we suggest the following order for progressing through the mask system. While this is the recommended path for players aiming for efficiency, feel free to tackle Horrific Visions in any order you prefer. The choice is yours on how you progress through the challenges with the masks.

The recommended order for progressing through the Faceless Masks is:

Burned Bridge ➜ Dark Imagination ➜ Nemesis ➜ Vengeance ➜ Daredevil ➜ Long Night ➜ Pained ➜ Multitudes

This is a suggested path to help players efficiently progress through the Horrific Visions mask system. However, feel free to choose any order based on your preferences and gameplay style.

  • Burned Bridge creates void zones with every step you take, and stepping into one drains 30 Sanity per second. Since the Sanity drain doesn’t scale with mask difficulty, it’s a great first mask to learn pathing and positioning without making fights harder.

  • Dark Imagination causes an add to spawn whenever your Sanity drops below 50%. With a fully upgraded Hourglass and Tribute system, this add should rarely appear unless you’re mismanaging your Sanity. Because of that, it’s a relatively low-risk mask and a solid second pick for progressing through higher-difficulty runs.

  • Nemesis introduces either Gamon or Hogger as elite enemies that spawn every 25 kills in a Horrific Vision. A visible counter tracks your progress, and since all kills (excluding critters) count, you can plan when and where they appear—saving weaker enemies for better timing. Defeating them also grants Sanity through the Elite Extermination Tribute, making them a useful tool for recovery. Learning to manage their spawns early on helps you control both difficulty and Sanity management efficiently.

  • Vengeance causes enemies to grant nearby allies a 20% damage buff for 20 seconds when they die. Since many packs in Horrific Visions include both harmless and dangerous enemies, this mask teaches important target prioritization. It’s helpful to get used to identifying and eliminating the high-threat mobs first while saving the low-threat ones for last, so you avoid boosting the most dangerous foes mid-fight. Mastering this mask early helps you stay in control of your pulls, especially in tougher zones or with multiple masks active.

  • Daredevil boosts all Sanity damage from creatures by 400%, turning boss mechanics into major threats. This is the mask where learning boss abilities becomes crucial—mistakes are far more punishing. Thankfully, the updated Horrific Visions let you both use and cast Sanity Restoration Orbs during combat, making them great tools against high-pressure fights like Umbric or Rexxar. If you time your orb usage right, you can recover from unavoidable hits or position poorly during chaotic mechanics without wiping your run.

  • Long Night doesn’t introduce any new mechanics—it simply cuts your maximum Sanity by 50%. Think of it as a test of everything you’ve learned so far. If you haven’t mastered Sanity management, this is the mask that will expose it. Every tick of damage and misstep will cost more, so now’s the time to plan your routes carefully, use orbs wisely, and avoid unnecessary Sanity loss. It’s a natural follow-up to Daredevil, turning pressure into precision.

  • Pained introduces an additional Madness to every wing in Horrific Visions. Some of these combinations can be especially tricky, such as Madness: Scorched Feet and Madness: Dark Delusions in Corrupted Areas, or Madness: Split Personality and Madness: Haunting Shadows in Lost Areas. With increased Sanity resistance compared to BFA, taking a bit more time between pulls to manage these affix combos is a smart way to handle the extra difficulty.

  • Multitudes is one of the most challenging new masks, significantly increasing the number of trash mobs in Horrific Visions and adding even more dangerous enemies. It can make encounters with masks like Nemesis and Vengeance even more difficult due to the larger, more complex packs. This is your final challenge, so take it slow—focus on one pack at a time and keep your composure.

Where To Enter Revisited Horrific Visions in The War Within

Once the Revisited Horrific Visions event becomes available, head to Dornogal, located just south of the Coreway tunnel, to queue. After completing the introductory questline, interact with the Portal to Horrific Visions to enter the weekly available Revisited Horrific Vision.

Once your queue is accepted, you’ll start in a room similar to the Heart Chamber in Silithus. In this space, you can track your Tribute progress, preview and choose how many Masks to use, and decide whether to have Soridormi assist you and what specialization she will use. When you’re ready, speak with the Image of Wrathion at the center of the room to begin the Vision scenario.

Upgrade System in Revisited Horrific Visions

The Titanic Research system from Battle for Azeroth returns in Revisited Horrific Visions, though restructured. It now consists of two systems: the Hourglass of Horrific Visions, where you use Displaced Corrupted Mementos to earn upgrades, and Tributes, which provide passive benefits as you complete Revisited Horrific Visions.

The Hourglass of Horrific Visions: Upgrade Tree

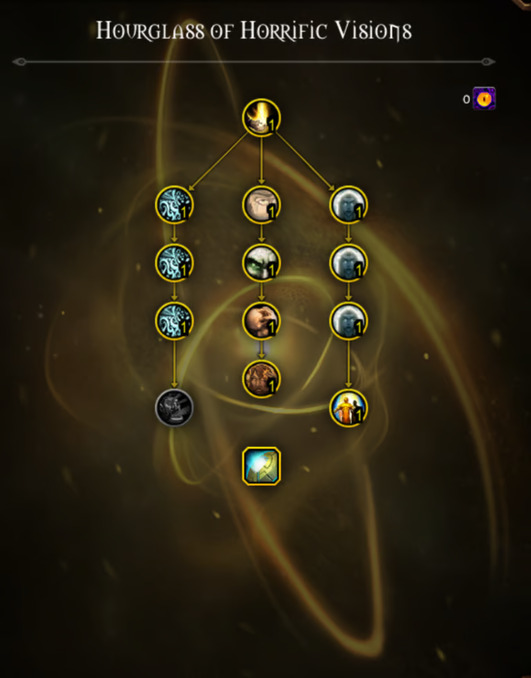
The Hourglass of Horrific Visions is a new upgrade system in Revisited Horrific Visions, designed to help you better navigate these challenges. It serves as a simplified version of the Titanic Research system, offering upgrades to enhance your survival and make the experience more manageable.

To upgrade the Hourglass of Horrific Visions, you’ll need Echo of N’zoth, which is obtained by exchanging Displaced Corrupted Mementos with Augermu in Dornogal. The system is timegated, and you can only acquire a limited number of Echoes of N’zoth per week, meaning full upgrades will take at least three weeks. Below is a table showing the required Displaced Corrupted Mementos for each Echo of N’zoth.

Week
1
20 / 100 / 300 / 500
2
700 / 800 / 900 / 1000
3
1100 / 1200 / 1300 / 1400 / 1500

Below are the upgrades for the Hourglass of Horrific Visions, categorized by their respective trait lines.

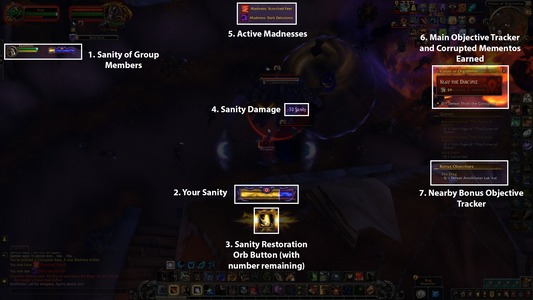
In Horrific Visions, enable Sanity Restoration Orb use. The orb revives all nearby allies and restores their Sanity.
Up to 3 Sanity Restoration Orbs can be summoned in a single vision, and orbs summoned by any player in the party count against this limit.

Singular Sanitation Expertise Tree

In Horrific Visions, reduced damage taken and increased damage done by 5%.
Each ally within 100 yds reduces this amount by 1%.
In Horrific Visions, reduced damage taken and increased damage done by 10%.
Each ally within 100 yds reduces this amount by 2%.
In Horrific Visions, reduced damage taken and increased damage done by 15%.
Each ally within 100 yds reduces this amount by 3%.
In Horrific Vsions, upon losing all Sanity or health, you revive instantly and gain 500 Sanity and full health. Occurs once per Vision.

Steeled Mind Tree

Reduces Sanity drain in Horrific Visions by 10%.
Reduces Sanity drain in Horrific Visions by 20%.
Reduces Sanity drain in Horrific Visions by 30%.
Reduces Sanity drain in Horrific Visions by 40%.

Expansive Mind Tree

In Horrific Visions, increase all party members’ maximum Sanity by 50.
In Horrific Visions, increase all party members’ maximum Sanity by 100.
In Horrific Visions, increase all party members’ maximum Sanity by 150.
In Horrific Visions, the first revival you perform on an ally costs no Sanity.

Gift of the Titans

Once all prior upgrades in the Hourglass of Horrific Visions are unlocked, you will gain access to the final upgrade:

In Horrific Visions, defeating enemies has a chance to grant Gift of the Titans, increasing haste and movement speed by 60% and reducing Sanity loss from all sources by 100% for 20 sec.

Tributes: Passive Upgrades

Tributes are a passive upgrade system in Revisited Horrific Visions. Displayed in the starting area of each vision, they unlock automatically as you hit specific milestones over multiple runs. These milestones are based on regular in-vision actions—like defeating enemies, using potions, or completing side objectives. As you progress, these upgrades enhance your power and survivability without requiring any manual investment.

Tribute of the Vision Hunter
This tribute is powered by defeating N’Zoth’s minions during Revisited Horrific Visions in Stormwind or Orgrimmar.

In Horrific Visions, killing an enemy grants 1% movement speed and haste for 60 seconds. Stacks up to 5.
In Horrific Visions, killing an enemy grants 2% movement speed and haste for 60 seconds. Stacks up to 5.
In Horrific Visions, killing an enemy grants 3% movement speed and haste for 60 seconds. Stacks up to 5.

Tribute of Elite Extermination
This tribute is powered by defeating N’Zoth’s Elite minions during Revisited Horrific Visions in Stormwind or Orgrimmar.

In Horrific Visions, defeating an Elite enemy restores 50 Sanity.
In Horrific Visions, defeating an Elite enemy restores 100 Sanity.
In Horrific Visions, defeating an Elite enemy restores 150 Sanity.


Tribute of Experimental Destabilization
This tribute is powered by defeating bosses during Revisited Horrific Visions in Stormwind or Orgrimmar.

In Horrific Visions, while above 50% Sanity, your damage done is increased by 4%.
While below 50% Sanity, your damage taken is reduced by 4%.
In Horrific Visions, while above 50% Sanity, your damage done is increased by 8%.
While below 50% Sanity, your damage taken is reduced by 8%.
In Horrific Visions, while above 50% Sanity, your damage done is increased by 12%.
While below 50% Sanity, your damage taken is reduced by 12%.


Tribute of Clear Sight
This tribute is empowered by interacting with hidden objects throughout Stormwind or Orgrimmar, specifically potions and Odd Crystals.

In Horrific Visions, able to see loot treasure chests in Tainted areas.
In Horrific Visions, able to see loot treasure chests in Tainted and Corrupted areas.
In Horrific Visions, able to see loot treasure chests in Tainted, Corrupted, and Lost areas.

Revisited Horrific Visions UI Overview

Horrific Visions uses specific UI elements, and this overview references the default in-game UI. If you’re unable to see certain features, like the Sanity Bar or Sanity Restoration Orb Button, it might be due to an add-on. Check your add-on settings to ensure nothing is obstructing these features.

Group Sanity
You’ll be able to track your party’s Sanity through both party and raid frames during Revisited Horrific Visions. Party frames show a detailed graphic, while raid frames display a simpler Sanity bar beneath each player. If an ally hits 0 Sanity or dies, their bar will glow, signaling they can be revived either by using a Sanity Restoration Orb near them or by donating half of your own Sanity to bring them back. This system supports better group coordination and recovery in high-difficulty runs.

Your Sanity
This bar tracks your current and maximum Sanity. If it reaches 0, you die—and if you’re running solo, the Horrific Vision ends and you’ll be ported to the exit to claim your rewards. Keep in mind that Sanity drains passively over time during visions, so avoid going AFK or standing idle too long, or you risk running out before completing your objective.

Sanity Restoration Orbs
Once unlocked, all players in the vision gain access to an extra action button that summons a Sanity Restoration Orb. When used, the orb fully restores both Sanity and Health to nearby allies over 10 seconds and grants immunity to all active Madness effects during its duration. It’s a powerful tool for recovery and survival, especially in tough encounters. Only three Sanity Restoration Orbs can be used during a single Horrific Vision run. The remaining number of available uses is clearly shown on the action button, allowing you to plan your orb usage carefully across the encounter.

Sanity Damage
Sanity Damage occurs when you lose Sanity due to specific abilities or mechanics. The amount of Sanity lost is displayed near your character on the screen, helping you keep track of how much damage you’ve taken.

Active Madnesses
These are the Madness effects that apply to you based on the area you’re in. They remain active until you enter a new area, which will typically introduce different Madness effects. You can hover over them to view specific details about what each effect does.

Main Objective Tracker
This tracker displays the current main objective of the Horrific Vision. Completing it will conclude the Vision. It also shows the total number of Corrupted Mementos you have earned during the run, which will be awarded once you leave the Horrific Vision.

Bonus Objective Tracker
When you approach a new area of the city, the area’s objective will appear as a Bonus Objective. These are optional tasks you can complete for extra rewards at the end of the Horrific Vision. There are four total Bonus Objectives within a single Horrific Vision. Completing them offers additional incentives, encouraging exploration and enhancing the challenge of the run.

Revisited Horrific Visions: Sanity

Sanity is a player resource that starts at 1000 by default. It depletes over time and can be further drained by specific abilities.

If your Sanity reaches 0, you die, and similarly, if you die, your Sanity is reduced to 0. Managing your Sanity is crucial for survival during Horrific Visions.

Passive Sanity Drain
While in any Vision of N’zoth, your Sanity drains passively simply by being within the Vision. The rate of this drain changes depending on the specific area you’re in during the Horrific Vision, so managing your position and time spent in each zone is essential to avoid running out of Sanity too quickly.

Sanity Damage from Creatures
Some enemies in the Visions of N’zoth cast abilities that drain your Sanity. In Horrific Visions, enemies with this ability are marked with a Sanity Breaker buff. These creatures are typically Elite or Boss mobs, and their abilities can significantly impact your Sanity. Be mindful of these enemies to avoid losing large amounts of Sanity quickly.

Sanity Damage from Mechanics
Many areas in the Horrific Visions environment will cause Sanity loss if you stand in them. These harmful effects may be caused by enemies, Madnesses, or environmental factors such as the glowing blue walls between areas. Stay vigilant and avoid these zones to minimize Sanity loss and stay focused on completing your objectives.

If a player dies and another player is still alive, the living player can use a Sanity Restoration Orb or give half of their Sanity to revive the fallen player with the amount given. If a solo player has Soridormi as an NPC, she can use a Sanity Restoration Orb to revive them. If all players die, the Horrific Vision ends, and MOTHER evacuates the group to the rewards chamber.

Gameplay and Objectives in Revisited Horrific Visions

In Horrific Visions, your objective is to complete 5 tasks: 1 main objective (defeating the main boss) and 4 bonus objectives. Defeating the main boss (Alleria Windrunner in Stormwind or Thrall in Orgrimmar) will automatically end the Vision, even if bonus objectives are left incomplete. The bonus objectives provide additional rewards and should be completed to maximize your score.

Your Sanity acts as both your resource and time limit in Horrific Visions. Completing all objectives requires upgrades that reduce Sanity-draining effects or provide ways to restore it. Without these upgrades, you’ll struggle to finish the objectives before running out of Sanity. Proper Sanity management is crucial for success.

Tainted Areas
The “Tainted Area” is the first area players will encounter in a Horrific Vision. It contains the “main objective” for each vision, which is crucial to complete on your first visit. The area is marked with a SKULL icon on both the objective tracker and the map/minimap. Completing this area and its objectives is essential for progressing further into the Horrific Vision.

Completing the main objective in the Tainted Area will immediately end the Horrific Vision, regardless of how many other objectives you’ve completed or how much Sanity remains

Corrupted and Lost Areas
The Horrific Vision has four additional areas beyond the starting Tainted Area, each with their own objectives. These areas have increased difficulty, with higher Sanity drain, tougher enemies, and more complex Madness effects:

  • Corrupted Area: Contains 2 Bonus Objectives of medium difficulty.

  • Lost Area: Contains 2 Bonus Objectives of hard difficulty.

Exploring these areas will provide additional challenges and rewards but requires careful Sanity management.

Revisited Horrific Visions: Madness Effects

Each area in the Horrific Vision applies a Madness effect to the player. These secondary effects are active while the player remains in these zones and vary depending on the area. They can significantly alter gameplay, adding an extra layer of challenge by influencing movement, combat, or decision-making as you progress through each section of the Vision.

Each Madness affix is consistent throughout the week but will change on a weekly basis. The affixes differ depending on the area you’re in, and you can view them by opening the map and mousing over the objectives. These effects can impact gameplay by introducing various challenges, such as altered combat mechanics or environmental hazards, making each visit to the Horrific Vision unique.

You can view your active Madness affixes at the top of the screen. Normally, players deal with one affix per area each week. However, players using the Faceless Mask of the Pained will face two affixes per area. This added challenge increases the difficulty, so managing these affixes becomes even more crucial to progressing through the Horrific Vision.

Table of Contents

Share the Post:

Recent Articles

Join Our Newsletter

Shopping Cart